Sometimes, certain apps, games, or services aren’t available in your current region, which can be frustrating. Fortunately, there’s a way to access them by changing your iPhone’s country. This lets you unlock region-specific content, enjoy features that weren’t previously available, and make the most of your device.
In this article, we’ll explain everything you need to know, including step-by-step instructions on how to change countries on iPhone and important points to consider before making the switch.
Part 1: Understanding Country/Region Settings on iPhone
The iPhone’s country or region setting is the one that controls your access to the content in different App Stores, including: apps, games, music, and services. It also has effects on the content of your App Store, payment methods and subscriptions, and even system features sometimes.
So changing your iPhone’s country might as well give you access to region-limited offers, media, and apps which were not available in your current location.
Key Points:
- Controls which apps, games, music, and services are available.
- Affects App Store content and system features.
- Influences payment methods and active subscriptions.
- Changes may impact access to region-specific offers or apps.
- Knowing the settings helps avoid losing important content when switching.
Part 2: Quick Ways to Change Country/Region on iPhone
1. Change Country from App Store
When to use this:
- You want to change your country straight from your iPhone.
- Make sure you have your payment details on hand and log in using your Apple ID.
- If you want immediate access to applications, games, or services from another area, this is an excellent option.
Step-by-step guide to iPhone change GPS location:
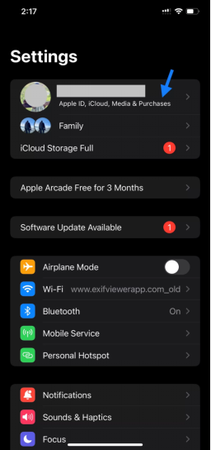
- step 1: Go to Settings on your iPhone or iPad.
- step 2: At the upper part, tap your name to access the Apple ID settings.
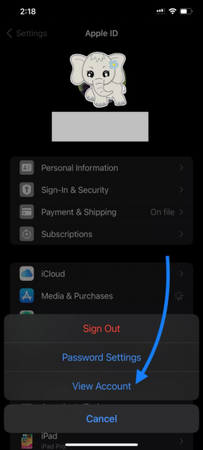
- step 3: Choose Media & Purchases then tap View Account to continue.
- step 4: If asked, enter your Apple ID password.
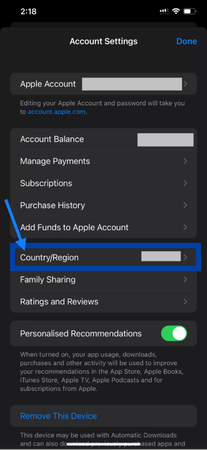
- step 5: Scroll down and tap Country/Region to start the change.
- step 6: Tap Change Country or Region. Remember, subscriptions, store credit, or payment info can affect this.
- step 7: From the list, select the country or region you wish to change to.
- step 8: Go through the terms and conditions and if you agree then click to proceed.
- step 9: Finally, add a valid payment method and a billing address for the new country.
2. Change Country via Apple ID Website
When to use this:
- You prefer managing your account from a computer or browser.
- You need to update payment methods or subscriptions before switching countries.
- Useful if you face issues changing the country directly on your device.
Step-by-step guide change iPhone location:
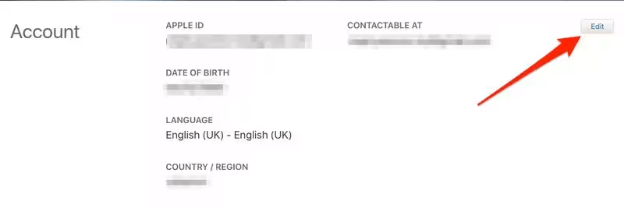
- step 1: Go to the Apple ID page and enter your password and Apple ID.
- step 2: Select Edit from the menu in the top right after tapping on Your Account.
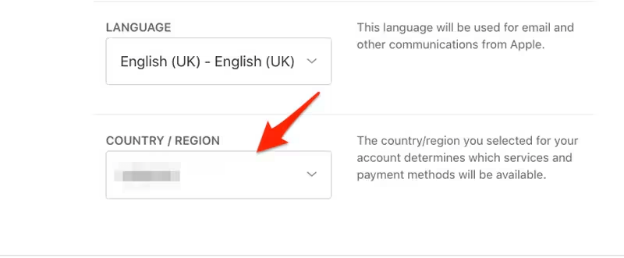
- step 3: Select your preferred nation by moving down to country/Region, opening the drop-down list, and then clicking on it.
- step 4: Click on the Continue button in the pop-up to confirm. You will be requested to provide payment information but you can bypass it and still save the changes.
Part 3: Best Tool to Change iPhone GPS Location
Sometimes, you need more than just changing your App Store country; you might want to change the iPhone location for apps, games, or social platforms. FonesGo Location Changer is a reliable tool for this.
It works without jailbreak, and lets you simulate GPS movement safely. Perfect for gaming, social apps, or location testing, it gives you full control over your virtual position on iPhone.

- Location changes on iOS devices without jailbreak.
- Walk, bike, or drive at different speeds to simulate GPS movement.
- Move using teleport, two spots, or multiple spots in games.
- Control movement with a joystick for realistic navigation.
- Spoof GPS on social apps privately with one click.
How to Use FonesGo to Change iPhone GPS Location
- step 1 Download and install FonesGo Location Changer from the official website or app link directly on your iPhone.
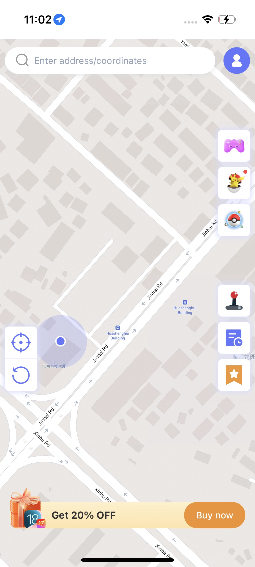
- step 2 Launch the application and the map will display your current GPS location.
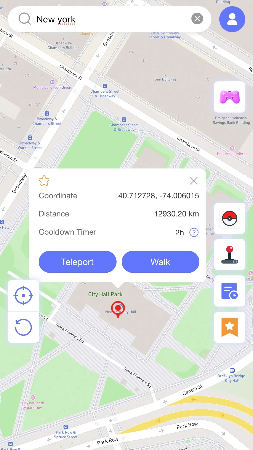
- step 3 Enter the location’s address or coordinates that you want to display.
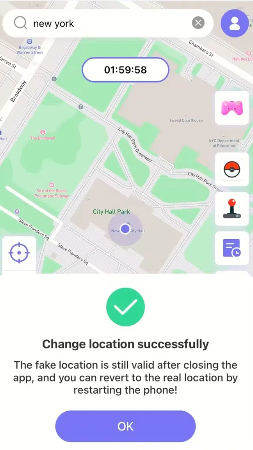
- step 4 Select the location and tap “Teleport”. Follow the prompt to configure VPN if needed. Your iPhone’s GPS location will change.
Part 4: Tips to Avoid “Can’t Change Country” Problems
Sometimes, changing your iPhone country or region can run into errors. Oftentimes these complications arise from subscriptions, payment methods, or unutilized store credit. Here is how to deal with typical problems and make the switching process smooth.
- Inspect current subscriptions: Before proceeding with the country change, you may need to pause Apple Music, TV+, or any other subscription-based third-party apps and cancel any active subscriptions. Active subscriptions often block country changes.
- Use up store credit: If you have remaining balance in your Apple ID, spend it or transfer it if possible. Even a small amount can prevent the switch.
- Update payment methods: Make sure you have a valid payment method for the new country. Some countries require local cards or PayPal accounts.
- Sign out from Family Sharing: If you are a member of a Family Sharing group, you must probably leave for the time being while you change your country.
- Restart the device: A reboot at times does wonders, clears the cache and hence makes the change process smoother.
- App availability: a change of country could mean losing some apps or services. Confirm that you can temporarily lose access before making the switch.
- Adhere to official procedures: Always rely on the Settings app or the Apple ID website to reduce errors.
Summary
Your iPhone’s country can be changed to unlock apps, games, and services available in a different region. This guide covers how to change countries on the iPhone using the App Store, Apple ID website, and tools like FonesGo Location Changer to also modify your GPS location safely.
For anyone who wants full control over their iPhone’s location, FonesGo Location Changer is a fast, reliable, and risk-free solution. Try it to unlock apps and features from any region instantly.

