WhatsApp has now become a global platform for not only chit-chatting but also business purposes. Among those strings of chats, people share threads of important pictures, either for personal or professional purposes. So, whether you want to save these media files securely for further reference or avoid getting short of your mobile storage, transferring them to your computer is the best option. What are you waiting for? Hop inside this exclusive guide to learn how to transfer photos from WhatsApp to PC!
Part 1: Why Do You Need to Transfer Pictures from WhatsApp to PC?
There can be multiple reasons behind you wondering how can I transfer photos from WhatsApp to PC. Firstly, you may want to save your files securely for use later for business purposes or to cherish personal memories. Secondly, you may just want to save space on your smartphone, ditching the potential memory shortage and slow speed issues.
Moreover, editing, printing, and proper organization are much easier on a PC than on a mobile device. While we have certain new Android and iOS editing and organizing software, nothing can beat those robust PC versions. The joy of editing on a bigger screen is also worth mentioning.
Part 2: [Android & iOS] How to Transfer Photos from WhatsApp to Computer?
Third-party software, like FonesGo, can make the entire transfer process a breeze with its exclusive features. With FonesGo, you can transfer your data at 3x speed with batch transfer, and there isn’t any need for a factory reset. This means it can save you a lot of time without compromising an inch on the transferred image quality. FonesGo supports 20+ data files for all its multidirectional transfers. Hop on below to learn more about it!
Key Features of FonesGo
Here are some of the worth discussing perks you can experience with FonesGo:
- 1. So far, the best tool for transferring WhatsApp images to PCs from multiple platforms.
- 2. Enables transferring data in bulk, saving you loads of time.
- 3. Allows access to backed-up data for review at any time.
- 4. Features a user-friendly and intuitive interface, ensuring ease of use.
How to Transfer WhatsApp Images to PC with FonesGo?
Here is how you can use FonesGo to backup WhatsApp images:
Step 1: Hop onto the FonesGo official website to download and install the software. Once the software is installed, launch it.
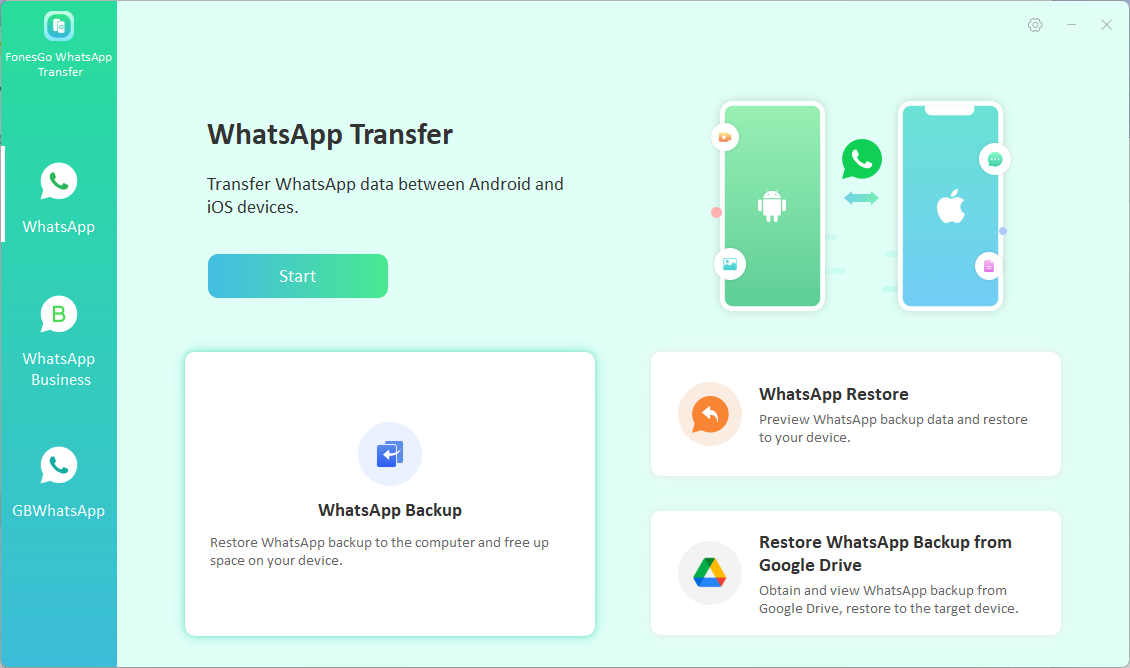
Step 2: Choose WhatsApp Backup from the main interface.
Step 3: Now connect your iPhone or Android to the PC via a compatible USB cable.
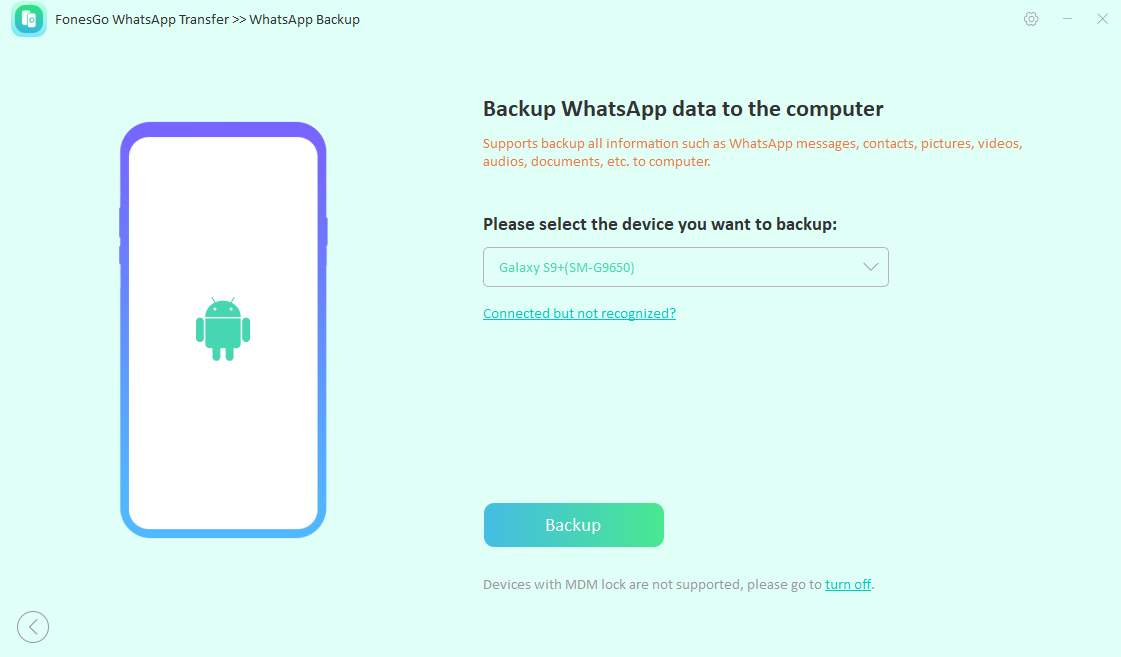
Step 4: Click Backup button to start the backup progress. Wait for a few minutes until the backup process is complete, and a message for successful termination shows up on the screen.
Step 5: View the backup list to go through all the details. You can now select the photos that you want to export to your computer.

Part 3: How to Transfer WhatsApp Photos to Computer via WhatsApp Web?
WhatsApp Web is an online version of WhatsApp that mirrors all your conversations. It’s compatible with Google Chrome, Opera, Safari, and Mozilla Firefox. To access it, you will have to scan the QR code on your PC to establish a connection. When connecting with your WhatsApp, ensure your mobile has enough battery, as the connection will be lost once your mobile turns OFF.
Let’s now hop onto the detailed step-by-step guide on how to transfer WhatsApp pictures to PC!
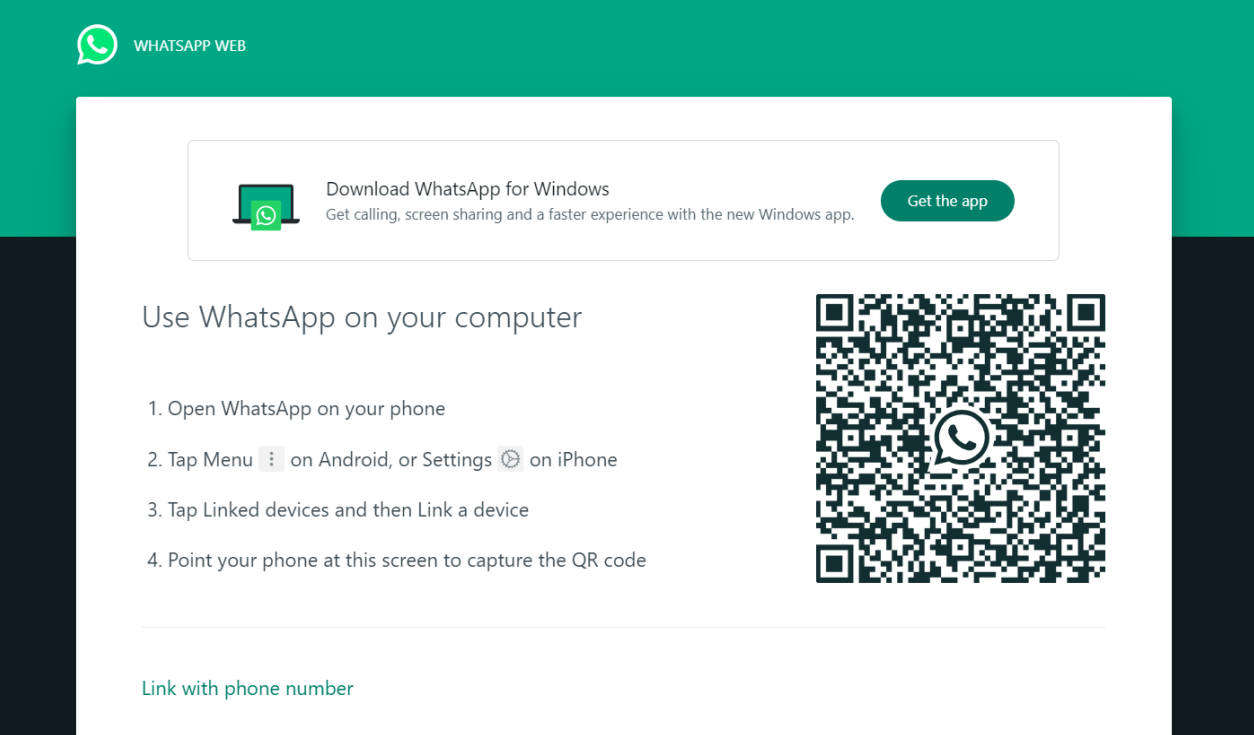
· Navigate to web.whatsapp.com on your computer.
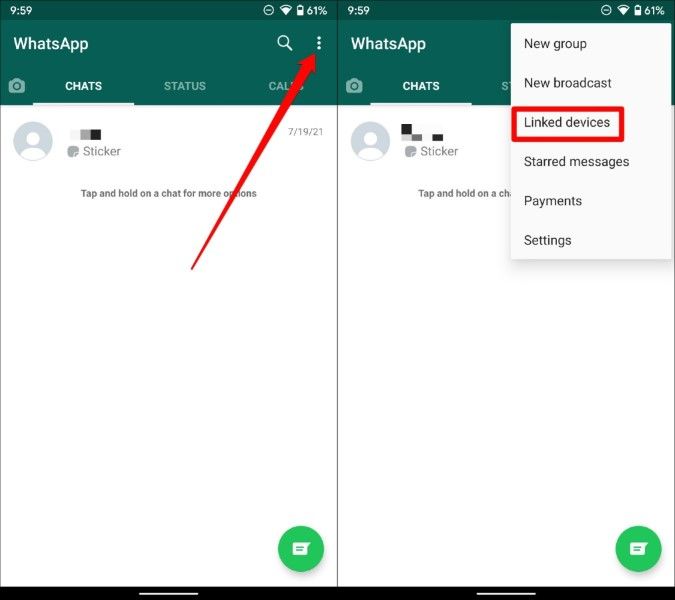
· Launch WhatsApp on your mobile phone and hit the three dots on the top-right.
· Select Linked Devices options from the menu.
· In the window, choose Link a Device. You can also check Device Status, i.e., the devices that have already linked.
· You will be asked to enter your password or scan your fingerprint to proceed further.
· Next, scan the QR code displayed on your computer screen and wait for a few seconds until you log into WhatsApp on your computer. You can also link with a phone number.
· Once chats show up, browse for the one from which you want to download images.
· Click on the arrowhead icon on the image and select Download.
Part 4: How to Transfer WhatsApp Photos to PC via Email?
Though the transfer of WhatsApp pictures via Email will be slower than usual, it’s still a commonly used method. However, there’s one issue: you can’t send files at once if their size exceeds 25 MB. You will have to send separate Emails. Here is how this method works:
· Launch WhatsApp on your mobile and go to chat in which you have desired media files.
· Click open the image that you want to share and hit the three-dot icon on the top right to reveal multiple options.
· Now, choose Share. A plethora of options will pop up; choose Gmail.
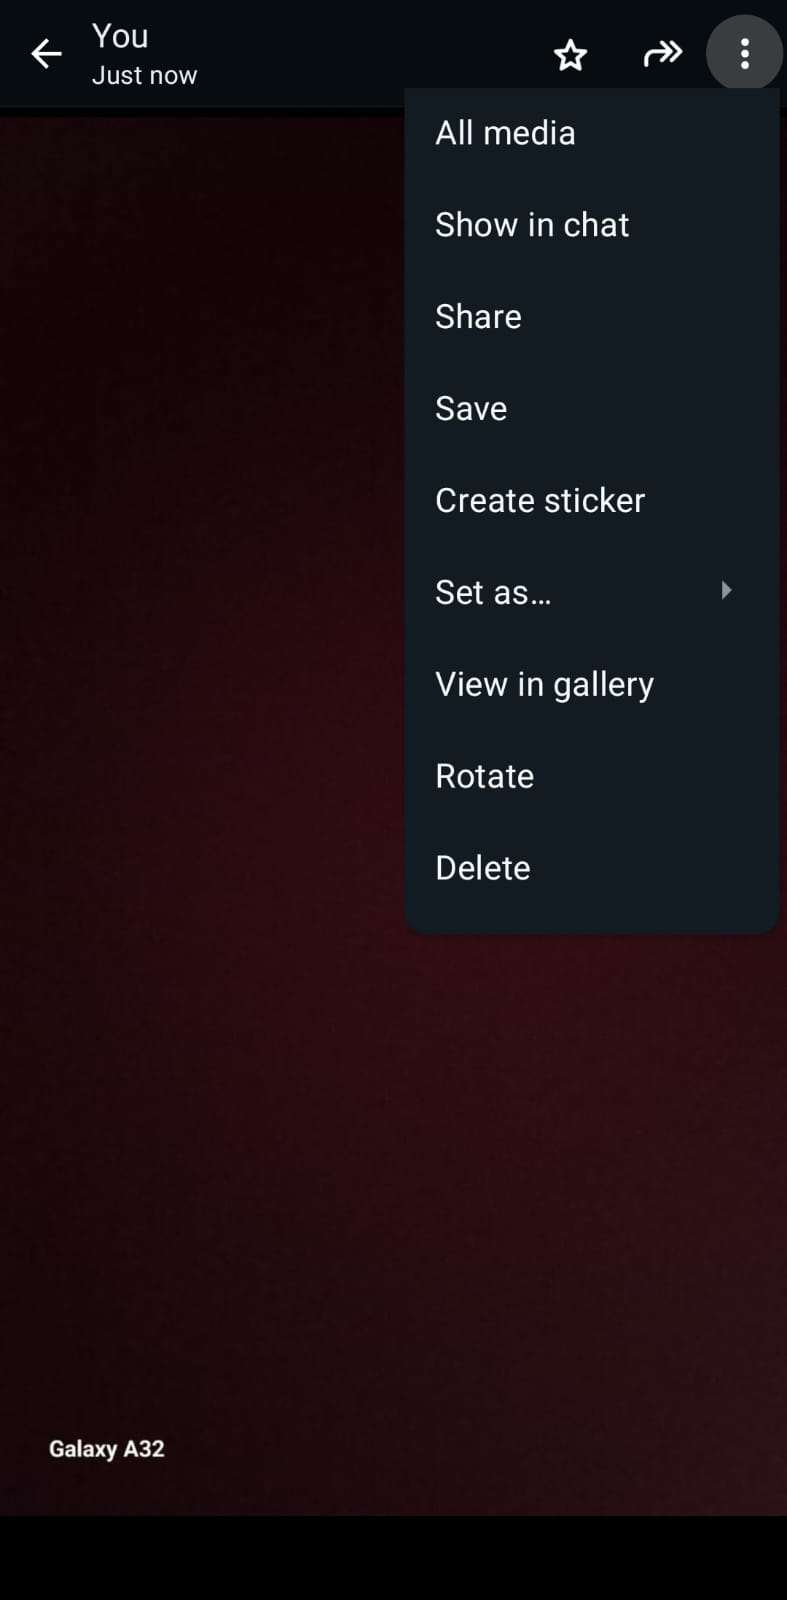
· Hit Gmail again to open a draft email with an image uploaded as an attachment.
· Now, you can send it to your PC after adding an email address.
· On your PC, go to gmail.com or open the Gmail app to find the email address you used as a recipient.
· Open the Email and hit the Download icon to download all your WhatsApp images.
If you want to share multiple files, you will have to select images from the WhatsApp Images folder in the Gallery. Choose to share them > Gmail and add an email address to send.
Part 5: Other 3 Ways to Transfer WhatsApp Images to PC
Aside from the above-mentioned methods, you can also use the following methods. Each of them is specific for either Android to PC transfer or iOS to PC.
1. Using USB Cable (Android to PC)
Here is your ultimate guide on how to transfer WhatsApp photos to PC:
· Ensure you have enabled the Auto-Save feature on your WhatsApp. You can access it by navigating to Settings > Storage and Data > Media auto-download.
· Connect your mobile to the computer via a USB cable.
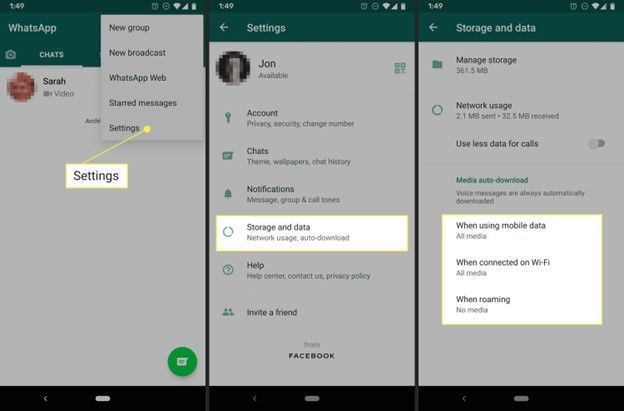
· Once the connection is established, swipe down your mobile screen from the top to access the notification area.
· Hit the USB charging this device notification and choose to Transfer files.
· Navigate to File Explorer on your PC and hit the mobile icon in the left pane.
· Access the Internal shared storage and hop inside the WhatsApp folder.
· Go to the Media folder > WhatsApp Images folder and copy the images that you want to save on your PC.
2.Google Photos (Android to PC)
Google Photos is a free-to-use multiplatform supporting app that syncs and stores all your media files. Here is a detailed guide on how to transfer WhatsApp photos to computer:
· Download Google Photos on your mobile if you don’t have it.
· Launch the app and sign in using your Google account.
· Navigate to File Explorer on your PC and hit the mobile icon in the left pane.
· Go to Library > WhatsApp Images folder and select the images that you want to transfer to your PC.
· Now, backup and sync Google Photos.
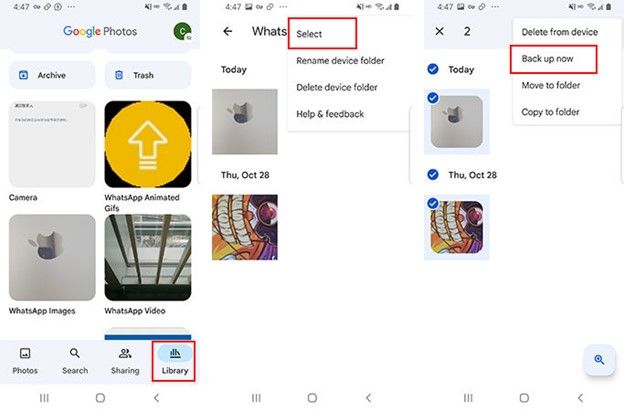
· On your computer, launch a browser and log into the Google Photos app with the same credentials.
· Choose the photos that you wish to download and hit More > Download. All the selected pictures will then be saved to your computer.
3.iCloud Drive (iOS to PC)
iCloud Drive for iOS is just like Google Drive for Android. You can rely on it to back up your desired WhatsApp photos and download them to your PC later. Here is how this method works:
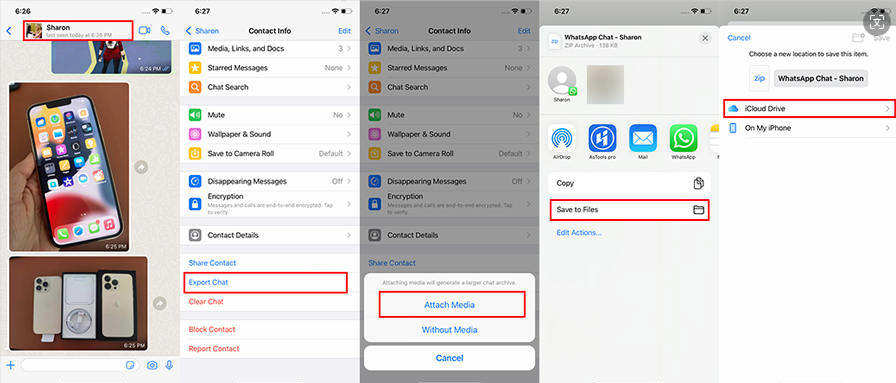
· Launch WhatsApp and go to the chat that you want to transfer.
· Tap on the name of the contact and choose the Export chat option.
· Attach Media and choose the Save to Files option.
· Now, select iCloud Drive and hit the Add/Save option. Note that you will have to repeat these steps to transfer photos from different chats.
· On your computer, you can access the shared files in iCloud Drive.
Conclusion
Long story short, you won’t feel short of ways when browsing how to transfer photos from WhatsApp to PC. All of these methods are reliable, but if you are looking for one that’s comprehensive, i.e., can be used for all sorts of media file transfers, be it videos, files, or whatever, even text messages, we recommend going with FonesGo. It’s indeed a dream software with a user-friendly interface and functionalities. So, why not give it a try?

- How to Fix the “This Account Can No Longer Use WhatsApp” Error
- Top 7 Ways to Fix “This Accessory Uses Too Much Power” within iOS 18
- How to Fix Move to iOS Not Working: Step-by-Step Guide
- A Complete Guide to Transfer from Android to iPhone After Setup
- Ultimate Guide: How to Transfer WhatsApp Business from Android to iPhone
